
xTrade Service Documentation
Welcome to xTrade! You can use our APIs to access various tools to aid the development of broking platforms.
You can view code examples in the dark area to the right, and you can switch the programming language of the examples with the tabs in the top right.
This documentation page was created with Slate.
Enjoy!
Services SDK
Install the Services SDK
Install the library:
composer require hyperionx/services-sdk
To get started, install the library of packages.
This is a plain PHP SDK that can be used in any PHP project. Please see the list of required dependencies in the project composer.json
The services that are currently implemented into this SDK are: - Compliance - Allows searching for sanction or adverse media on a company or individual and retrieval of search certificates - Storage - Used for storage of documents and files - Enrichment - Allows enrichment of Howden Data such as address lookups
Please see the separate sections below which go into details about what methods are available for each service.
If you are installing this in a Laravel Project, you are advised to use the laravel Services SDK (See Laravel Services SDK section)
Authentication
Authentication with the APIM is handled for you when using the SDK. As part of running any methods the service will check for an active access token and if one does not exist it will attempt to retrieve one using the client id and secret provided
Example of initialising a service
$guzzleClient = new GuzzleHttp\Client();
$complianceService = new HX\Compliance\ComplianceService($guzzleClient, 'clientSecret', 'clientId', 'subscriptionKey', true);
By default, access tokens are stored in a file in the root /tmp directory under the name of the service class that created them. This can be overridden to use the same caching as your application in the following way.
Create a new class that extends the HX\OAuthClientAzureAPIM class
Override the methods getAccessTokenFromCache and storeAccessTokenInCache in the base class to get and store the tokens as you require
Example class where
getAccessTokenFromCacheandstoreAccessTokenInCachemethods are overridden
class CustomOAuthClientAzureAPIM extends HX\OAuthClientAzureAPIM
{
    // this method must return either null or a stdClass with the key access_token
    protected function getAccessTokenFromCache():? \stdClass
    {
           return Cache::has($this->cacheKey) ? (object) ['access_token' => Cache::get($this->cacheKey)] : null;
    }

    protected function storeAccessTokenInCache($token): void
    {
        Cache::put($this->cacheKey, $token->access_token, $token->expires_in);
    }
}
Before initialising the service class, call the static method
setOauthClientClasswith your full class name
HX\Compliance\ComplianceService::setOauthClientClass(CustomOAuthClientAzureAPIM::class);
$guzzleClient = new GuzzleHttp\Client();
$complianceService = new HX\Compliance\ComplianceService($guzzleClient, 'clientSecret', 'clientId', 'subscriptionKey', true);
Services SDK Laravel
Install the Laravel Services SDK
Install the library:
composer require hyperionx/services-sdk-laravel
To get started, install the library of packages.
This is a Laravel PHP SDK that is based from the PHP Services SDK so all methods on the PHP SDK will also work here with some additional laravel integrations. Please see the list of required dependencies in the project composer.json
The services that are currently implemented into this SDK are: - Compliance - Allows searching for sanction or adverse media on a company or individual and retrieval of search certificates - Storage - Used for storage of documents and files - Enrichment - Allows enrichment of Howden Data such as address lookups - Clause Service - Allows fetching Airtable clauses - FX Rates - specifically designed to interact with the Open Exchange Rates API, offering functionalities to query FX Rates with specific query parameters in order to fetch supported currencies, historical rates, etc. - Party Service - Allows fetching party details
Please see the separate sections below which go into details about what methods are available for each service.
If you are installing this in a Non Laravel PHP Project, you are advised to use the PHP Services SDK (See Services SDK section)
Service Provider
package:discover will automatically discover the ServiceProvider from the package
After the service provider has been registered you can publish the config:
shell
php artisan vendor:publish --provider=XdmServicesServiceProvider
which will create xdm-services.php in the app config directory
Add the following azure APIM connection details to the the .env file:
AZURE_APIM_CLIENT_ID=
AZURE_APIM_CLIENT_SECRET=
AZURE_APIM_SUBSCRIPTION_KEY=
In config/services.php, set up your configuration:
    'azure_apim' => [
        'client_id' => env('AZURE_APIM_CLIENT_ID', ''),
        'client_secret' => env('AZURE_APIM_CLIENT_SECRET', ''),
        'subscription_key' => env('AZURE_APIM_SUBSCRIPTION_KEY', '')
    ],
The APIM client credentials will be read from config('services.azure_apim').
Storage
To use the XDM storage adapter, set FILESYSTEM_DRIVER to xdm:
set the filesystem adapter to xdm
FILESYSTEM_DRIVER=xdm
Usage
The Laravel adapter for XDM services hides much of the complexity of file manipulation, condensing often complex tasks into simple one-liners.
Examples
If you've set up the adapter as your default filesystem adapter, the following examples apply:
Upload a file
// $contents may be either a string or a resource
Storage::put($path, $contents);
Download a file
Storage::download($path);
Copy or move a file
Storage::copy($path, $new_path);
Storage::move($path, $new_path);
Delete a file
Storage::delete($path);
Get a file as a string
Storage::get($path);
Check if a file exists
Storage::exists($path);
Get last modified date, as a timestamp
Storage::lastModified($path);
Prepend and append strings to a file
Storage::prepend($path, 'This is prepended');
Storage::append($path, 'This is appended');
Generate a public url for a file
$url = Storage::url($path);
Manipulate directories
Storage::makeDirectory($directory_path);
Storage::deleteDirectory($directory_path);
Get a list of files in a directory
Storage::files($directory_path);
Get a list of files in a directory and its subdirectories
Storage::allFiles($directory_path);
Get a list of directories in a directory
Storage::directories($directory_path);
Get a list of directories and their subdirectories in a directory
Storage::allDirectories($directory_path);
If you've not set up the adapter as your default, the adapter must be specified using the disk() method:
Storage::disk('xdm')->put($path, $contents);
Storage::disk('xdm')->download($path);
Storage::disk('xdm')->copy($path, $new_path);
Storage::disk('xdm')->move($path, $new_path);
See the Laravel documentation for more usage information.
Compliance
The compliance part of the package exposes an instance of the HX Compliance SDK to the IoC of your app available through:
Instance of compliance service is made available with the following command
$instance = resolve(\HX\Compliance\ComplianceService::class);
Configuration
To enable the compliance features of the package you will need to add the following to your environment config
Enable compliance features
XDM_SERVICES_COMPLIANCE_ENABLED=true
Sandbox mode is enabled by default so when in production the following environment variable should be added
Disable Sandbox Mode
XDM_SERVICES_COMPLIANCE_SANDBOX_MODE=false
There is also an additional configuration variable to tailor the timout (default 5s) of calls to the service
Set a timeout on calls to the service
XDM_SERVICES_COMPLIANCE_TIMEOUT=5
Please refer to the xdm-services-sdk documentation for usage of the ComplianceService instance.
Sanctions Check Queue
TODO...
APIM Authentication
If you are using the SDK, authentication is handled for you and you can skip these steps.
Currently, the only SDK available is for PHP, so implementing our services in other languages will require some manual interaction with the APIM.
Getting an access token
Request
To get an access token you should make a POST request to
https://login.microsoftonline.com/cb9bec90-76b1-4992-96fe-d8d470564931/oauth2/v2.0/token, this URL is the same
for all environments.
In the body of this request you will need three fields:
grant_type- This will always beclient_credentialsscope- Depending on environment, this will beapi://hx-apim-nonprod/.defaultorapi://hx-apim-prod/.defaultclient_id- The client ID given to your applicationclient_secret- The client secret given to your application
If you don't have client credentials, contact a member of the xTrade Services team.
POST https://login.microsoftonline.com/cb9bec90-76b1-4992-96fe-d8d470564931/oauth2/v2.0/token
Content-Type: application/x-www-form-urlencoded

grant_type=client_credentials&scope=api%3A%2F%2Fhx-apim-nonprod%2F.default&client_id=CLIENT_ID&client_secret=CLIENT_SECRET
Response
If successful, the response for the above request should look something like the example response on the right.
{
    "token_type": "Bearer",
    "expires_in": 3599,
    "ext_expires_in": 3599,
    "access_token": "eyJ0eXAiOiJKV1QiLCJhbGciOiJSUzI..."
}
We recommend caching this token using the expires_in as the TTL (seconds).
Accessing APIM Services
Once you have your bearer token, you can make a request to one of our services using a combination of the bear token and your subscription key.
Your bearer token should be added to an Authorization header in the format Bearer <token>.
Your subscription key should be added to an Ocp-Apim-Subscription-Key header as is.
GET https://preprod.api.hx.digital/enrichment/api/address/GB|RM|B|53612981
Authorization: Bearer eyJ0eXAiOiJK...
Ocp-Apim-Subscription-Key: 1baf7b5da...
The base URLs for the APIMs are as follows:
- Nonprod -
https://preprod.api.hx.digital - Prod -
https://api.hx.digital
B2C (SOAP)
What is it?
B2C is an Azure service that provides user authentication and identity management for applications. It offers user management via the Azure portal, login functionality for internal and external users, MFA, and password reset.
Application setup
Each application that uses B2C needs an app registration, this lives in the Azure B2C tenant, an app will have multiple app registrations at least one for production and one for non-production, but you can also have multiple non-production app registrations if you want to manage your users per lower environment, e.g. DEV, UAT, PREPROD, etc.
When creating an app registration, you will need to provide some redirect URIs, these are stored on the Azure portal and define valid callback URLs for your application. You will need one for a successful login callback, and one for a password reset callback, for example:
- https://app.com/auth
- https://app.com/password-reset
Alongside app registrations, you will need a corresponding group, this group defines the users that have access to your application in each environment you have set up.
These tasks should be done by DevOps, to get started, email xTrade support with a request for a new B2C application and access group.
Install the B2C dependencies
Backend
The following dependencies were built for our traditional application stack, Laravel and VueJS. Using B2C with other stacks may require a manual approach.
Install the backend library with composer:
composer require hyperionx/hyperion-x-auth-validation
This package includes a database migration that will create an azure_users table with the necessary fields for the
flow to work.
It also provides an api/token endpoint for your application to retrieve access tokens from Azure B2C using an authorization code, or a refresh token.
The authorization codes and refresh tokens are generated and maintained through the corresponding front end
package hyperion-x-auth.
The package also provides an AuthenticateWithAzure middleware which validates the JWT token sent to the server
from the front end. This middleware will generate and use a public key to decode the JWT token, validating its
authenticity.
The claims found in the token are used to store some information about the user, the claims being used by default are as follows:
sub: the unique identifier for the user within Azure B2Cname: the user's full nameemail: the email used by the user for authenticationidp: this is the source provider, this is only returned for internal users authenticating with their HX login, the value will always be howdengroup.com
The package provides an AzureUser model and azure_users table, this is used as the user model for authentication
and in the middleware. In most cases you will want to add custom fields and logic to your user model, this can be done
by extending AzureUser in your base user model and adding migrations for the missing fields. The package uses
the setUser method to create or find the user by their open_id (sub claim) and update their
information, this will account for any changes the user makes to their information and will be reflected in your
database.
Configuration
Add the service provider to your app.php configuration.
Add the service provider to your app.php configuration:
/*
 * Package Service Providers...
 */

 HyperionX\Authentication\AuthValidationServiceProvider::class,
Publish the configuration.
Publish the configuration:
php artisan vendor:publish --provider="HyperionX\Authentication\AuthValidationServiceProvider"
Add the relevant .env variables to your application:
Add the middleware to your app by creating a new middleware group in your HTTP Kernel with
the AuthenticateWithAzure class included, then this group can be referenced in your routes using the group name.
Env variables
The following environment variables will need to be added, these can be sourced by DevOps after creating your app registration via the Azure B2C portal:
HX_AUTH_AZURE_TENANT: This is the azure tenant name your app is connecting to, this will either be hypxdev or
hypxprod, for development and production environments respectively
HX_AUTH_CLIENT_ID: This is your application (client) ID, found in the Azure B2C portal
HX_AUTH_CLIENT_SECRET: This is the application (client) secret, also found in the Azure B2C portal
HX_AUTH_REDIRECT_URI: This is your application base URL followed by /auth, e.g. https://myapp.com/auth
HX_AUTH_PASSWORD_RESET_REDIRECT_URI: This is your application base URL followed by /password-reset,
e.g. https://myapp.com/password-reset
HX_AUTH_HOME_REDIRECT: This is the URL we redirect to after a successful login, e.g. https://myapp.com/home.
HX_AUTH_POST_LOGOUT_REDIRECT_URI: This is the URL we redirect to after a successful logout, e.g. https://myapp.com
HX_AUTH_HX_IDP_URL: This is the source of authority of the identity provider for internal users, this should be
set to howdengroup.com
HX_AUTH_STYLES_URL: This is the URL for a public CSS file, this will apply any custom styling to the login pages.
Frontend
Install the fontend library with npm or yarn:
npm install @hyperionx/hyperion-x-auth
For this package to function correctly, please ensure the backend package has been installed and configured correctly with all the relevant environment variables, the front end package relies on these environment variables being available.
Usage
In your app.js, import the HyperionAuth class from the package and declare it as an instance property
Import the HyperionAuth class from the package and declare it as an instance property:
import {HyperionAuth} from "@hyperionx/hyperion-x-auth";

Vue.prototype.$hyperionAuth = new HyperionAuth();
Using VueRouter, run the initialize function between routes.
Using VueRouter, run the initialize function between routes:
router.beforeEach((to, from, next) => {
  router.app.$hyperionAuth.initialize();
  // ...
});
The initialize method can optionally take a successCallback, failureCallback and an auto login boolean
value.
These parameters all have default values, so it can be used without them.
The default success callback is to redirect to the home page, the home page is configured using the environment
variable HX_AUTH_HOME_REDIRECT, e.g. https://app.com/home
The default failure callback takes a parameter called errorDescription and returns to the login page with the
error description as a url parameter e.g. https://app.com/login?error=error+description+here
The default value for autologin is false.
To trigger the login flow, you can call the login method using the instance property we declared earlier.
Login:
this.$hyperionAuth.login()
To trigger a logout, you can call the logout method on the same instance property.
Logout:
this.$hyperionAuth.logout()
Calling the login method will redirect the user to the external B2C login page, here they can either login with their internal Howden account, or external users can enter an email and password.
Calling the logout method will end the user's session with B2C, it will then redirect to the post logout redirect URI
defined by the environment variable HX_AUTH_POST_LOGOUT_REDIRECT_URI
Calling the initlialize function between routes will check that the user is authenticated, it will do this by checking
the local storage item called hyx-auth for an access token. If the user is authenticated it will continue to the
next route as normal, if they are not, it will check whether the current URL path is /auth or /password-reset, if this
is the case there are some actions to take. If we are at the password reset URL it means the user has just reset their
password successfully, so this will trigger a redirect to the login page with a url parameter called info
containing a success message e.g. https://app.com/login?info=Password+changed+successfully. If we are at the /auth path,
we will either have an authorization code passed back from a successful login, or an error. If there is an authorization
code, this is passed to the back end package through the /api/token route, this will return some authentication
info including an access token which is stored in local storage as hyx-auth. The successCallback is then
invoked, this will either be the callback passed to the initialize function or the default success callback. If there is
an error this will invoke the failureCallback passed into the initialize function, or the default failure
callback.
The initlialize method will also set up axios interceptors which will check for expired access tokens before a request is made, it will refresh the access token if it is expired.
Custom styling
B2C ships with a very plain looking login page, this can be customised with a custom style sheet, create your style
sheet and make it publicly available and provide the URL via the HX_AUTH_STYLES_URL env variable.
There some out of the box design templates that can be used instead of a custom design, there are generic designs available with themes for Howden, xTrade and HX. You can use one of these as is, or you can use it as a starting point for a custom design, these style sheets can be found here.
We strongly recommend looking at the SOAP repo, you can find the css files that are used for the Howden, xTrade and HX defaults, they may be useful to build on top of. Also, you will find a number of example HTML pages where the styles would be applied, Azure injects all content for each page dynamically, so these pages are a representation of what will be injected by Azure and are good for development and testing.
Error messages
| Error Message | Location | Meaning |
|---|---|---|
| Please enter your email | User login form | The user has not entered a valid email address |
| Please enter your password | User login form | The user has not entered a password |
| We can't seem to find your account | User login form | The email address provided does not have an account in Azure B2C |
| Your password is incorrect | User login form | The email address is a valid account but the password is incorrect |
| The password has expired. | User login form | The password has been reset in the B2C portal. This method is not supported; the user should reset their password by clicking the forgot password link |
| Your account is temporarily locked to prevent unauthorized use. Try again later. | User login form | The user has exceeded the maximum number of password attempts (10 attempts). They will be locked out for 60 seconds initially. Each subsequent attempt will incrementally increase the lockout time. |
| This information is required. | Password reset screen / New Password screen | The user has not entered the information for this field |
| The password entry fields do not match. Please enter the same password in both fields and try again. | New Password screen | The password entry fields do not match. |
| The password must be between 8 and 256 characters. | New Password screen | The password does not abide by the policy |
| The password must include an uppercase letter. | New Password screen | The password does not abide by the policy |
| The password must include a lowercase letter. | New Password screen | The password does not abide by the policy |
| The password must include a digit. | New Password screen | The password does not abide by the policy |
| The password must include a symbol. | New Password screen | The password does not abide by the policy |
| Please select your country code | Register for MFA screen | Country code is not selected |
| Please enter a valid phone number | Register for MFA screen | The telephone number must be at least 7 digits including the country code |
| The verification code you have entered does not match our records. Please try again, or request a new code. | MFA Screen | The verification code entered does not match the one sent to the phone |
| The phone number you provided is unreachable or you have hit the limit on the number of verification attempts. | MFA Screen | The code has been sent too many times or the SMS message cannot be sent or the phone is unreachable. |
| A user failed to authenticate with Azure | Main application login screen | Generic error message that identifies there is an issue with the SOAP setup. Check the credentials used to connect to B2C are correct. |
| Permission to read profile denied by user | Main application login screen | The user was asked to allow access to their profile and selected no. The user should retry and select yes. |
| Maximum number of multi-factor authentication attempts exceeded | Main application login screen | The user exceeded the maximum tries for MFA. The limit is currently 3. |
| Your session has expired, please re-authenticate | Main application login screen | Either, the refresh token has expired, the user account no longer exists, or the grant has been revoked |
| Your account is locked, contact support or try again later | Main application login screen | The user account has been blocked from the B2C user settings. They will need to be unblocked to allow sign in. |
Info messages
| Info Message | Where is it returned | What does it mean |
|---|---|---|
| Password changed successfully | Main application login screen | The user has successfully updated their password |
| Access denied Access needs to be granted at the application level. Please contact your system admin. |
After a successful sign in attempt | The user has a B2C user but has not been added to the application group in Azure. |
| Welcome Thank you for registering your interest. If approved, you'll be granted access. |
After a successful sign in attempt as an internal user | The first time an internal user tries to login. This will create a user with no applications linked. |
Compliance Sanctions
Install the Services SDK
Install the library with composer:
composer require hyperionx/services-sdk
To use the compliance sanctions service you can either directly interface with the api or use the PHP SDK or PHP laravel SDK.
The below documentation will guide you through using the SDK
The PHP SDK uses guzzle 7.0 or higher so this means if your app uses Laravel it should be Laravel 8 or higher.
Initialising the compliance service
When initialising the compliance service you will need to pass through the guzzle client, client secret, client id, subscription key and if you want to connect to sandbox or not. Once the service is initialised any methods can be called without needing to re-initialise
Initialising the service
$guzzleClient = new GuzzleHttp\Client();
$complianceService = new HX\Compliance\ComplianceService($guzzleClient, 'clientSecret', 'clientId', 'subscriptionKey', true);
Creating a new sanctions search
For each sanction search we need to create a model and pass in the data in an array for the search. The field types are as follows:
- name (string) - name of the company being checked for sanctions - required for company sanctions search
- firstName (string) - first name of the person being checked for sanctions - required for person sanctions search
- lastName (string) - last name of the person being checked for sanctions - required for person sanctions search
- userName (string) - name of the user performing the search (normally the logged in user) - required
- businessArea (string) - business area of the user performing the search (normally the logged in user) - required
- checks (Array of strings) - The types of checks the search should perform. - at least one check type required. Can be one or more of the following:
- sanction
- aml
- fraud
- warning
- fitness-probity
- pep
- pep-class-1
- pep-class-2
- pep-class-3
- pep-class-4
- adverse-media
- adverse-media-financial-crime
- adverse-media-violent-crime
- adverse-media-sexual-crime
- adverse-media-terrorism
- adverse-media-fraud
- adverse-media-narcotics
- adverse-media-general
The following are optional fields
- dob (string) - the date of birth for a person
- addressLine1 - first line of the address
- postcode - the postcode
- exactMatch (boolean) - If the search fields should be matched exactly, defaults to false
- isMonitored - allows the search to be monitored in comply advantage, defaults to false
- includeDeceased - returns results for deceased persons, defaults to false
- reference - a unique reference for a search
- countryIsoCode - can be either alpha 2, alpha 3 or numeric code - this is only used to identify the search fuzzy score and not passed to the downstream service.
Note: the userName and businessArea fields are used by the service to add a comment to the search with the user that created it. This helps compliance contact the relevant party if there is a sanctions match.
Create model for company search
$params = [
  'name' => 'Company Name',
  'checks' => ['sanctions'],
  'userName' => 'Users Name',
  'businessArea' => 'Users Business Area'
];
$search = new HX\Compliance\Models\ComplianceSearch\ComplianceSearch($params);
Create model for person search
$params = [
  'firstName' => 'John',
  'lastName' => 'Doe',
  'checks' => ['sanctions'],
  'userName' => 'Users Name',
  'businessArea' => 'Users Business Area'
];
$search = new HX\Compliance\Models\ComplianceSearch\ComplianceSearch($params);
Perform the search
// returns a ComplianceSearchResponse object
$searchResults = $complianceService->checkSanction($search);

// turn the response to an array
$searchResultsArray = $searchResults->toArray();

// Alternatively get each attribute seperately
$uuid = $searchResults->getUuid();
$riskLevel = $searchResults->getRiskLevel();
//etc...
Retrieving a search certificate
The compliance certificate can be retrieved for any search regardless of the match status or risk level.
Retrieving the certificate will return a .pdf file in binary format.
Retrieving a search certificate
$certificate = $complianceService->getCertificate('uuid');
Retrieving results from a previous search
The results from a previous search can be returned by either passing in the uuid or reference of a previous search.
Get results of a previous search
// By UUID
$searchResults = $complianceService->getSearch('uuid');

// By reference
$searchResults = $complianceService->getSearch(null, 'reference');

// returns a ComplianceSearchResponse object as per a new sanctions search
Updating a previous search
Some search fields can be updated later these fields include - assigneeId (string) - the comply advantage user id of the assignee - matchStatus (string) - the comply advantage user id of the assignee. Must be one of the following values: - unknown - no_match - potential_match - false_positive - true_positive_approve - true_positive_reject - riskLevel (string) - the search risk level. Must be one of the following values - low - medium - high - unknown
Uuid is the only required param.
Get results of a previous search
$params = [
  'uuid' => 'search_uuid',
  'matchStatus' => 'no_match',
  'riskLevel' => 'medium',
  'assigneeId' => '1'
];

// Initialise the ComplianceSearchUpdate model
$searchUpdate = new HX\Compliance\Models\ComplianceSearchUpdate($params);

// By reference
$searchResults = $complianceService->updateSearch($searchUpdate);

// returns an array in the following format
[
    'uuid' => '255949c2-7ff4-482e-a2d6-0',
    'reference' => 'testReference',
    'assigneeId' => '1',
    'riskLevel' => 'low',
    'matchStatus' => 'match',
];
Finding a previous search by search criteria
It is possible to get the details of a previous search using the search criteria used when the search was created. To do this initialise a new ComplianceSearch model in the same way as shown above only entering the details you know.
Find a search
$search = new HX\Compliance\Models\ComplianceSearch\ComplianceSearch(['name' => 'Howden']);

// Create comment one of the search matches
$searches = $complianceService->findSearch($search);

// returns an array in the following format
[
    'data' => [
        [
            'uuid' => '255949c2-7ff4-482e-a2d6-0',
            'firstName' => 'David',
            'lastName' => 'Howden',
            'postcode' => 'WC1 ABC',
            'dob' => '1970-01-01',
            'reference' => '1234'
        ],
        [
            'uuid' => '255949c2-7ff4-482e-a2d6-0',
            'name' => 'Howden Ltd.',
            'reference' => '1234'
        ]
  ]
];
Get or create comments on a previous search
Comments can be created against a search or against a match within the search. We define if the comment is created against the match or the search by including an entityId for a comment against a match or leaving this null for creating against a search.
Create a comment on a search / search match
// Create comment on search
$complianceService->createComment('uuid', 'This is a comment');

// Create comment one of the search matches
$complianceService->createComment('uuid', 'This is a comment', 'entityId');

// returns a true on success
Get comments on a search
$complianceService->getComments('uuid');

// will return an array such as the below
[
    'totalComments' => 1,
    'data' => [
        [
            'id' => '5fbe55cded1c4cdaead77c0f',
            'createdAt' => '2020-11-25T13:02:05.009000',
            'message' => 'This is a comment',
            'entityId' => 'N0HUXBOHUAA52RH',
            'userId' => 1
        ]
      ]
];
Retrieving a list of compliance users
The list of complince users is needed if you would like to show who a compliance search is assigned to or to assign it to another user. A compliance search will return a assignedTo user id however this will need to be compared to the user list to find more details like the name of the user.
Retrieving compliance users
// To get all users
$users = $complianceService->getUsers();

// To get a user by name
$users = $complianceService->getUsers('name');

// will return an array such as the below
[
    'totalMatches' => 1,
    'data' => [
        [
            'id' => 1,
            'email' => 'test@example.com',
            'name' => 'User Name',
            'phone' => '(232) 055-04567',
            'updated_at' => '2015-06-15 09:15:12',
            'created_at' => '2015-06-15 09:15:12'
        ]
    ]
];
Enrichment
Install the Services SDK
Install the library with composer:
composer require hyperionx/services-sdk "^3.5.0"
To use the enrichment service you can either directly interface with the api or use the PHP SDK.
To use the compliance sanctions service you can either directly interface with the api or use the PHP SDK.
The below documentation will guide you through using the SDK.
The PHP SDK uses guzzle 7.0 or higher so this means if your app uses Laravel it should be Laravel 8 or higher.
Initialising the enrichment service
When initialising the service you will need to pass through the guzzle client, client secret, client id, subscription key and if you want to connect to sandbox or not. Once the service is initialised any methods can be called without needing to re-initialise
Initialising the service
$guzzleClient = new GuzzleHttp\Client();
$enrichmentService = new HX\Enrichment\EnrichmentService($guzzleClient, 'clientSecret', 'clientId', 'subscriptionKey', true);
Searching For an address
The enrichment service allows you to pass in an address as a string and will suggest similar address or an address container (i.e. an address that contains other addresses such as the address of a block of flats).
Each result in the search will contain a key named 'type', if the type is 'Address' then the id can be used in the getAddress() method of the enrichment service to get the full address. If the type is anything other than 'Address' this is a 'Container' and this id should be passed into the findAddressesByContainerId() method of the enrichment service to findout the addresses within this container.
Search for an address with a string
$searchResults = $enrichmentService->findAddressesUsingSearch('123 Any Lane');

//This will return an array in the following format
[
  [
      'id' => '123456',
      'type' => 'Address',
      'text' => '123 Any Lane',
      'description' => 'London'
  ],
    [
      'id' => '23456',
      'type' => 'Address',
      'text' => '123 Any Lane',
      'description' => 'Manchester'
  ],
];
Search for an address with a container id
$searchResults = $enrichmentService->findAddressesByContainerId('123456');

//This will return an array in the following format
[
  [
      'id' => '123456',
      'type' => 'Address',
      'text' => '123 Any Lane',
      'description' => 'London'
  ],
    [
      'id' => '23456',
      'type' => 'Address',
      'text' => '123 Any Lane',
      'description' => 'Manchester'
  ],
];
Get a single address using the address id
$searchResults = $enrichmentService->getAddress('123456');

//This will return an array in the following format
[
    'id' => '123456',
    'company' => 'ABC Comp Lts',
    'addressLine1' => 'flat 4',
    'addressLine2' => '123',
    'addressLine3' => 'Any Lane',
    'addressLine4' => 'A neighbourhood',
    'addressLine5' => 'A district',
    'premiseName' => 'A Premise Name',
    'subPremiseName' => 'A Sub Premise Name',
    'city' => 'London',
    'country' => 'England',
    'countryIsoAlpha2' => 'GB',
    'countryIsoAlpha3' => 'GBR',
    'countryIsoNumber' => '826',
    'postalCode' => 'ABC 123',
    'poBox' => '12234',
];
Searching For an address Geolocation
The enrichment service allows you to find the latitude and longitude of a location by passing in both a country and a location.
The country can be either an ISO Alpha 2 or ISO Alpha 3 in addition to a country name i.e. 'england' however you are advised to use ISO codes whenever possible. (Numeric ISO codes are not supported) The Location passed in can either be a postcode or location name
Search for an address geocode
$searchResults = $enrichmentService->findAddressGeocode('GB', 'SW1A');

//This will return an array in the following format
[
  [
        'name' => 'Any Lane, London',
        "latitude" => 51.6178,
        "longitude" => 0.2989
  ]
];
Clause Service
Introduction
This guide is designed for developers aiming to integrate the Clause Service into their applications. The Clause Service, developed in Node.js using the Nest.js framework, facilitates seamless interaction with the Airtable API, allowing for efficient data manipulation and retrieval. It enhances our suite of services by providing a streamlined approach to Airtable API communication.
Installation
The Clause Service is bundled within our Services SDK. Before integrating the Clause Service, ensure the Services SDK is installed in your project.
Install the library with composer:
composer require hyperionx/services-sdk "^3.5.0"
To use the clause service you can either directly interface with the api or use the PHP SDK.
The below documentation will guide you through using the SDK.
The PHP SDK uses guzzle 7.0 or higher so this means if your app uses Laravel it should be Laravel 8 or higher.
Authentication
Authentication is managed automatically within the SDK. The Clause Service, like other services in the SDK, checks for an active access token before executing any methods. If an access token is not present, the service will attempt to retrieve one using the provided client ID and secret. This process is transparent to the user, simplifying the authentication workflow.
Clause Service + SDK Integration Overview
The Clauses Service is specifically designed to interact with the Airtable API, offering functionalities to query Airtable bases with custom parameters. This service simplifies the process of fetching data from Airtable by abstracting the complexities of direct API calls.
Configuration Steps
Service Provider Registration: Create or update a service provider to register the Clause Service with Laravel's service container. This ensures that your application can efficiently use a single instance of the Clause Service wherever needed.
Environment Configuration: Ensure that your application's .env file contains the necessary configurations for the Clause Service, including the client secret, client ID, and subscription key for the Azure API Management (APIM) service.
Service Provider Implementation: In your service provider, instantiate the ClauseService with the required parameters (client, client secret, client ID, subscription key, and sandbox flag) and register it as a singleton in the application's service container.
$this->app->singleton(ClauseService::class, function () {
    return new ClauseService(
        new Client(),
        config(self::APIM_CLIENT_SECRET),
        config(self::APIM_CLIENT_ID),
        config(self::APIM_SUBSCRIPTION_KEY),
        config('app.env') !== 'production'
    );
});
Usage Guide
Injecting the Clause Service: Use dependency injection to include the Clause Service in the constructors of your controllers or services where you intend to use it. This approach allows Laravel to automatically resolve and inject the Clause Service instance.
public function __construct(ClauseService $clauseService)
{
    $guzzleClient = new Client();
    $this->clauseService = $clauseService;
}
Querying Clauses: Utilize the Clause Service's getAirtableClauses method to fetch clauses based on various parameters such as fields, filter formulas, max records, page size, and sorting criteria. Tailor these parameters to match your specific use case.
// This will only return records with fields HTML, and clauseServiceClauseNumber
$records = $clauseService->getAirtableClauses("HTML,clauseServiceClauseNumber")

{
  "records": [
      {
          "id": "rec1ZrjPPO7fjTtZI",
          "createdTime": "2024-01-25T12:08:59.000Z",
          "fields": {
              "HTML": "<p><strong>DEPTH LIMIT AMENDMENT<\/strong><\/p>\\n<p><strong>Applicable to the Liability Section and the Contractors All Risks Section.<\/strong><\/p>\\n<p>The following exclusions are amended as follows:<\/p>\\n<p>6.3.12 <strong>Excavations <\/strong><\/p>\\n<p style=\\\"margin-left: 20px;\\\">loss of or damage to excavations below [Value] metres in depth.<\/p>\\n<p>7.2.2 <strong>Construction and\/or Demolition<\/strong><\/p>\\n<p style=\\\"margin-left: 20px;\\\">excavations below [value] metres in depth;<\/p>\\n<p>Subject otherwise to the Policy terms Conditions Limitations and Exclusions<\/p>",
              "clauseServiceClauseNumber": 7
          }
      },
      {
          "id": "rec2N1eyxLnSbeNRO",
          "createdTime": "2023-11-28T09:44:22.000Z",
          "fields": {
              "HTML": "<html><p>All as per Howen Specialty Diving and Offshore Contractors Wording, as attached, and including:</p>\n<p>Medical Repatriation Costs/Expenses Exclusion Clause WNR121/034 as attached</p>\n<p>Environmental Statutory Liability Extension To Section 2 as attached</p>\n<p>Loss of Amenities Clause as attached</p>\n<p>Employers Liability Tracing Office Clause as attached</p></html>",
              "clauseServiceClauseNumber": 1
      }
  ]
}
Handling Responses: Process the response from the Clause Service to suit your application's needs, whether it's displaying the data in a view, returning a JSON response, or further manipulating the data.
getAirtableClauses Query Parameters
The Clause Service API offers a range of query parameters to fine-tune your requests for clauses from Airtable. Here's a breakdown of each parameter, including examples to illustrate their usage.
Query Parameters
- fields
- Description: Specifies the field names to include in the result. Separate each field name with a comma. If omitted, all fields will be returned.
- Type: string
- Required: No
- Example:
clauseServiceName,clauseServiceID
- filterByFormula
- Description: Filters records based on a formula. Records meeting the formula criteria are included in the response.
- Type: string
- Required: No
- Example:
{clauseServiceName} = 'Howden Speciality Diving & Offshore Contractors'
- maxRecords
- Description: Sets the maximum number of records to return. If this exceeds pageSize, multiple pages may be needed.
- Type: integer
- Required: No
- Example:
100
- pageSize
- Description: The number of records per request, up to a maximum of 100. Defaults to 100 if not specified.
- Type: integer
- Required: No
- Example:
100
- sort
- Description: Sorting criteria using the format 'field:direction'. Separate multiple criteria with commas.
- Type: string
- Required: No
- Example: clauseServiceClauseNumber:desc,clauseTitle:asc
- view
- Description: The name or ID of a view in the clauses table. Records in this view are returned and sorted by the view's order unless overridden by the sort parameter.
- Type: string
- Required: No
- Example:
All Clauses
- cellFormat
- Description: Determines how cells are formatted in the response. Using json formats cells as JSON, similar to Airtable's UI export options.
- Type: string
- Required: No
- Example:
json
- timeZone
- Description: The time zone used to format dates when cellFormat is set to string. Required if cellFormat is string.
- Type: string
- Required: No
- Example:
Europe/London
- userLocale
- Description: The locale used to format dates when cellFormat is string. Required if cellFormat is string.
- Type: string
- Required: No
- Example:
en
- returnFieldsByFieldId
- Description: When set to true, fields in the response are returned as field IDs instead of field names.
- Type: boolean
- Required: No
- Example:
false
- recordMetadata
- Description: Specifies additional metadata fields to include with each record, such as 'commentCount'.
- Type: array of strings
- Required: No
- Example:
["commentCount"]
Stamp Service
Last updated: Feb 27, 2024
Introduction
This guide is designed for developers integrating the Stamp Service into their applications. The Stamp Service, built on Node.js (Nest.js), enables the dynamic generation of stamp images based on specified criteria.
APIM Authentication
The Stamp Service does not support the PHP SDK and requires manual authentication via the API Management (APIM) platform. Refer to our APIM Authentication guide for detailed authentication procedures.
API Usage Example
To generate a stamp, perform a POST request as shown below:
curl -X POST https://api.hx.digital/stampservice/v1/stamps/generate \
-H "Content-Type: application/json" \
-H "Authorization: Bearer YOUR_API_KEY" \
-H "Ocp-Apim-Subscription-Key: YOUR_SUBSCRIPTION_KEY" \
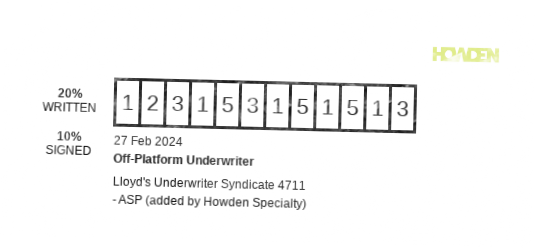
-d '{
"insurerName": "Off-Platform Underwriter",
"reference": "123153151513",
"text": "Lloyd\'s Underwriter Syndicate 4711 - ASP (added by Howden Specialty)",
"writtenLine": 20,
"signedLine": 10,
"logoRef": "https://online.howdengroup.com/img/solstice/logos/Howden_Main_Logo_GREEN.png",
"enableOverlay": true
}'
Request Details
- Endpoint: https://api.hx.digital/stampservice/v1/stamps/generate
- Method: POST
- Headers:
- Content-Type: application/json: Indicates the format of the data being sent.
- Authorization: Bearer YOUR_API_KEY: Replace YOUR_API_KEY with your actual API key for authentication.
- Ocp-Apim-Subscription-Key: YOUR_SUBSCRIPTION_KEY: Replace YOUR_SUBSCRIPTION_KEY with your subscription key provided for API access.
- Payload: JSON object containing:
- insurerName: The name of the insurer.
- reference: A unique reference ID.
- text: Descriptive text for the stamp.
- writtenLine: Percentage of the written line (e.g., 20).
- signedLine: Percentage of the signed line (e.g., 10).
- logoRef: URL to the logo image.
- enableOverlay: Boolean to enable/disable overlay which makes the stamp image look more authentic/stampy. Overlay should only be used on light backgrounds, preferably white.
This command sends a request to the Stamp Service to generate a stamp image based on the provided parameters. Adjust the payload according to your specific needs for accurate stamp generation.
Example Generated Stamps

FX Rates
Introduction
This guide is designed for developers aiming to integrate the FX Rates Service into their applications. The FX Rates Service, developed in Node.js using the Nest.js framework, facilitates seamless interaction with the Open Exchange Rates API, allowing for efficient data manipulation and retrieval. It enhances our suite of services by providing a streamlined approach to Open Exchange Rates API communication.
Installation
The FX Rates Service is bundled within our Services SDK. Before integrating the FX Rates Service, ensure the Services SDK is installed in your project.
Install the library with composer:
composer require hyperionx/services-sdk "^3.5.0"
To use the FX Rates service you can either directly interface with the api or use the PHP SDK.
The below documentation will guide you through using the SDK.
The PHP SDK uses guzzle 7.0 or higher so this means if your app uses Laravel it should be Laravel 8 or higher.
Authentication
Authentication is managed automatically within the SDK. The FX Rates Service, like other services in the SDK, checks for an active access token before executing any methods. If an access token is not present, the service will attempt to retrieve one using the provided client ID and secret. This process is transparent to the user, simplifying the authentication workflow.
FX Rates Service + SDK Integration Overview
The FX Rates Service is specifically designed to interact with the Open Exchange Rates API, offering functionalities to query FX Rates with custom parameters. This service simplifies the process of fetching data from Open Exchange Rates by abstracting the complexities of direct API calls.
Configuration Steps
Service Provider Registration: Create or update a service provider to register the FX Rates Service with Laravel's service container. This ensures that your application can efficiently use a single instance of the FX Rates Service wherever needed.
Environment Configuration: Ensure that your application's .env file contains the necessary configurations for the FX Rates Service, including the client secret, client ID, and subscription key for the Azure API Management (APIM) service.
Service Provider Implementation: In your service provider, instantiate the FXRatesService with the required parameters (client, client secret, client ID, subscription key, and sandbox flag) and register it as a singleton in the application's service container.
$this->app->singleton(FXRatesService::class, function () {
    return new FXRatesService(
        new Client(),
        config(self::APIM_CLIENT_SECRET),
        config(self::APIM_CLIENT_ID),
        config(self::APIM_SUBSCRIPTION_KEY),
        config('app.env') !== 'production'
    );
});
Usage Guide
Injecting the FX Rates Service: Use dependency injection to include the FX Rates Service in the constructors of your controllers or services where you intend to use it. This approach allows Laravel to automatically resolve and inject the FX Rates Service instance.
public function __construct(FXRatesService $fxRatesService)
{
    $guzzleClient = new Client();
    $this->fxRatesService= $fxRatesService;
}
Fetching Supported Currencies: Utilize the FX Rates Service's getSupportedCurrencies method to fetch all supported currencies.
// This will return all of the supported currencies
$supportedCurrencies = $fxRatesService->getSupportedCurrencies()

{
    "AED": "United Arab Emirates Dirham",
    "AFN": "Afghan Afghani",
    "ALL": "Albanian Lek",
    "AMD": "Armenian Dram",
    "ANG": "Netherlands Antillean Guilder",
    "AOA": "Angolan Kwanza",
    "ARS": "Argentine Peso",
    "AUD": "Australian Dollar",
    "AWG": "Aruban Florin",
    "AZN": "Azerbaijani Manat",
    "BAM": "Bosnia-Herzegovina Convertible Mark",
    "BBD": "Barbadian Dollar",
    "BDT": "Bangladeshi Taka",
    "BGN": "Bulgarian Lev",
    "BHD": "Bahraini Dinar",
    "BIF": "Burundian Franc"
}
Fetching Historical Rates: Utilize the FX Rates Service’s getHistoricalFXRates method to fetch historical rates based on various parameters such as date, baseCurrency, and conversionCurrencies. Tailor these parameters to match your specific use case.
// This will return all of the historical rates for the 2022-01-19 with the base currency as GBP
$historicalRates = $fxRatesService->getHistoricalFXRates("2022-01-19", "GBP")

{
    "STD":28726.202456,
    "STN":29.803143,
    "SVC":11.909052,
    "SYP":3418.515776,
    "SZL":20.927857,
    "THB":44.815829
   },
   "baseCurrency":"GBP"
}
Fetching Historical Rates for a specific time period: Utilize the FX Rates Service’s getHistoricalFXRatesForTimePeriodmethod to fetch historical rates within a specific time period depending on the parameters such as startDate, endDate, baseCurrency, and conversionCurrencies. Tailor these parameters to match your specific use case.
// This will return all of the historical rates for the time period from 2022-01-19 until 2023-01-19 with the base currency as GBP
$historicalRates = $fxRatesService->getHistoricalFXRatesForTimePeriod("2022-01-19", "2023-01-19", "GBP")

{
  "rates": {
      "2022-01-19": {
          "AED": 4.998627,
          "AFN": 143.188464,
          "ALL": 146.274302,
          "AMD": 654.240526,
          "ANG": 2.452873,
          "AOA": 719.22197,
          "ARS": 141.814353,
          "AUD": 1.885899,
          "AWG": 2.449573,
          "AZN": 2.313486,
          "BAM": 2.347807,
          "BBD": 2.721748,
          "BDT": 117.010472
      }
  }
}
Fetching Annual FX Rates average for a specific year: Utilize the FX Rates Service’s getAnnualAverageFXRates method to fetch the annual FX rates average depending on the parameters such as year (YYYY), baseCurrency, and conversionCurrencies. Tailor these parameters to match your specific use case.
// This will return the annual fx rates average for the year 2023 with the base currency as GBP and for conversion currencies USD, and EUR
$annualAverage = $fxRatesService->getAnnualAverageFXRates("2023", "GBP", ["USD", "EUR"])
{
    "rates": {
        "average": {
            "EUR": 1.149212315068494,
            "USD": 1.2439351342465748
        }
    },
    "year": "2023"
}
Handling Responses: Process the response from the FX Rates Service to suit your application's needs, whether it's displaying the data in a view, returning a JSON response, or further manipulating the data.
Party Service
Last updated: Feb 09, 2024
Introduction
This guide is tailored for developers looking to incorporate the Party Service into their applications. Developed in Node.js and accessible via a PHP-based Services SDK, the Party Service offers a robust solution for searching and retrieving detailed information about parties across a range of sources. It leverages the Dun and Bradstreet API, enhancing our suite of services with a simplified approach to accessing a comprehensive and reliable party database.
Installation
The Party Service is bundled within our Services SDK. Before integrating the Party Service, ensure the Services SDK is installed in your project.
Install the library with composer:
composer require hyperionx/services-sdk "^3.5.0"
To use the Party service you can either directly interface with the api or use the PHP SDK.
The below documentation will guide you through using the SDK.
The PHP SDK uses guzzle 7.0 or higher so this means if your app uses Laravel it should be Laravel 8 or higher.
Authentication
Authentication is managed automatically within the SDK. Party Service, like other services in the SDK, checks for an active access token before executing any methods. If an access token is not present, the service will attempt to retrieve one using the provided client ID and secret. This process is transparent to the user, simplifying the authentication workflow.
Party Service + SDK Integration Overview
The Party Service is specifically designed for direct interaction with the Dun and Bradstreet API, facilitating efficient searches for party information based on various criteria. This service significantly simplifies the process of fetching detailed party data, abstracting away the complexities typically associated with direct API calls.
Configuration Steps
Service Provider Registration: Begin by registering a service provider to integrate the Party Service with Laravel's service container. This step is crucial for enabling your application to effectively utilize the Party Service, ensuring a single instance is available for use as needed.
Environment Configuration: Configure your application's .env file with the necessary settings for the Party Service. This includes specifying the client secret, client ID, and subscription key required for Azure API Management (APIM) service interaction.
Service Provider Implementation: Instantiate the PartySearchService with the required parameters (client, client secret, client ID, subscription key, and environment flag) in your service provider. Then, register it as a singleton within the application's service container, as shown below:
$this->app->singleton(PartySearchService::class, function () {
    return new PartySearchService(
        new \GuzzleHttp\Client(),
        config(self::APIM_CLIENT_SECRET),
        config(self::APIM_CLIENT_ID),
        config(self::APIM_SUBSCRIPTION_KEY),
        config('app.env') !== 'production'
    );
});
Usage Guide
Injecting the Party Service: Use dependency injection to include the Party Service in the constructors of your controllers or services where you intend to use it. This approach allows Laravel to automatically resolve and inject the Party Service instance.
public function __construct(PartyService $partyService)
{
    $guzzleClient = new Client();
    $this->partyService = $partyService;
}
Creating a Party Request
Before executing searches, construct a PartySearchRequest using a fluent builder pattern. This approach allows you to add various search criteria components such as names, registrations, and premises efficiently:
// Start building the search request
$searchRequest = PartySearchRequest::build()
    ->addName(new PartyNameRequestComponent(/* configuration */))
    ->addRegistration(new PartyRegistrationRequestComponent(/* configuration */))
    ->addPremises(new PartyLocationRequestComponent(/* configuration */))
    ->setType(PartySearchRequest::TYPE_ORGANISATION)
    ->setProfile(PartySearchRequest::PROFILE_DUN_AND_BRADSTREET);
Utilizing the Party Service
Leverage the PartySearchService methods to conduct party searches or fetch specific party details. These methods interact with the Dun and Bradstreet API, offering straightforward mechanisms for executing searches (searchParties) and retrieving party information (getParty).
Searching for Parties
$searchCriteria = $searchRequest->toArray();
$searchResponse = $this->partyService->searchParties($searchCriteria);
Retrieving Party Details
$partyId = 'unique_party_identifier';
$partyDetails = $this->partyService->getParty($partyId);
MRC Document Generation
Install the Services SDK
Install the library with composer:
composer require hyperionx/services-sdk "^3.7.0"
The minimum version required for the MRC service is ^3.7.0.
The PHP SDK uses guzzle 7.0 or higher so this means if your app uses Laravel it should be Laravel 8 or higher.
Initialising the MRC service
When initialising the service you will need to pass through the guzzle client, client secret, client id, subscription key and if you want to connect to sandbox or not.
Initialising the service
$guzzleClient = new GuzzleHttp\Client();
$mrcService = new HX\Mrc\MrcService($guzzleClient, 'clientSecret', 'clientId', 'subscriptionKey', true);
Generating a document
The MRC service allows you to pass in a base64 encoded document template, an array of data used for populating merge fields, and a response format. This will return the base64 encoded document content.
The base64 encoded template must be in one of the following formats: RTF, DOC, DOCX or TX.
The return format must be one of the following formats: "PDF", "PDFA", "RTF", "DOC", "DOCX", "HTML" and "TX".
Generating a document
$response = $mrcService->generateDocument($base64EncodedTemplateFile, $jsonData, "PDF");

// This will return an array in the following format
[
  "content" => "VBERi0xLjQNJeLjz9MNMSAwIG9iago8PAovVHlwZS9FeHRHU3RhdGUKL1NBIGZhbHNlCi9T..." // base64 encoded document content
];
Appending documents
The MRC service allows you to append multiple documents together. You can pass in an array of base64 encoded documents, a document divider, and a response format. This will return the base64 encoded document content.
The base64 encoded documents must be in one of the following formats: RTF, DOC, DOCX or TX.
The document divider must be one of the following values: 1, 2, or 3, representing the following: - 1 No divider - 2 New paragraph - 3 New section
The return format must be either "PDF" or "DOCX".
Appending documents
$response = $mrcService->appendDocuments($base64EncodedDocuments, 1, "PDF");

// This will return an array in the following format
[
  "content" => "VBERi0xLjQNJeLjz9MNMSAwIG9iago8PAovVHlwZS9FeHRHU3RhdGUKL1NBIGZhbHNlCi9T..." // base64 encoded document content
];
Errors
xTrade Services use the following error codes:
| Error Code | Meaning |
|---|---|
| 400 | Bad Request -- Your request is invalid. |
| 401 | Unauthorized -- Your credentials are incorrect or missing. |
| 403 | Forbidden -- The endpoint requested is restricted. |
| 404 | Not Found -- The specified endpoint could not be found or returns no data. |
| 405 | Method Not Allowed -- You tried to access an endpoint with an invalid method. |
| 406 | Not Acceptable -- You requested a format that isn't supported. |
| 410 | Gone -- The content requested has been removed from our servers. |
| 422 | Unprocessable Entity -- Validation of your data failed. |
| 429 | Too Many Requests -- You're requesting too many times! Slow down! |
| 500 | Internal Server Error -- We had a problem with our server. Try again later. |
| 503 | Service Unavailable -- We're temporarily offline for maintenance. Please try again later. |